
How to add an MQTT device in Home Assistant on the EG5120 edge gateway
|
|
Time to read 7 min
|
|
Time to read 7 min
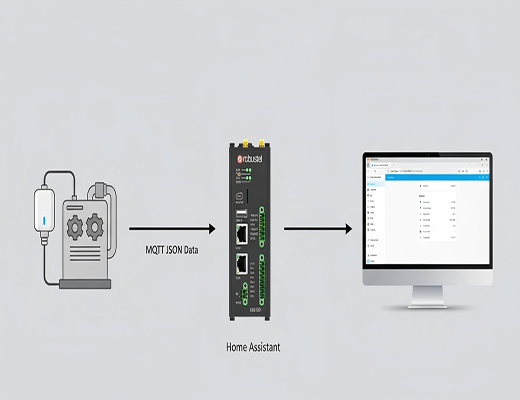
This article provides a step-by-step guide on how to add and configure an MQTT device within Home Assistant running on a Robustel EG5120 Industrial Edge Computing Gateway.
We'll walk through the initial connection, setting up the MQTT integration, and configuring a smart plug sensor using YAML.
The final goal is to display real-time data from the device directly on your dashboard.
So, you've got the powerful Robustel EG5120 edge gateway, and you're running Home Assistant on it. Smart move. You've already bypassed the limitations of a typical Raspberry Pi, opting for an industrial-grade platform with a stable Debian OS that's built for the long haul. But let's be clear: the real magic happens when you start connecting devices. In my experience, the most flexible and powerful way to do that in the IoT world is with MQTT.
What's the plan? We're going to bridge the gap between your industrial hardware and a truly smart, local automation hub. Forget relying on the cloud for every little action. We're going to set up an MQTT Home Assistant integration right on your EG5120. I'll guide you through connecting a typical MQTT-enabled smart plug, from initial setup to seeing its data pop up live on your dashboard. It's easier than you think, isn't it?
Let's dive into the hands-on process. For this walkthrough, I'm using a common scenario: integrating an MQTT smart plug to monitor the power status of a piece of equipment. This is incredibly useful in an industrial setting for tracking machine uptime or energy consumption.
Before we roll up our sleeves and dive in, let's make sure you have everything you need. Here’s a quick checklist:
First things first, we need to access the Home Assistant interface running on the EG5120. It's a straightforward process.
http://192.168.0.1:8123. This is the default address. The real 'aha!' moment for many engineers is realizing that if the device has been used before, the gateway IP might be different. You can easily find the correct address by checking the "Default Gateway" IP in your computer's network details after connecting.With Home Assistant up and running, it's time to teach it how to speak MQTT. This involves adding the core integration that listens for MQTT messages.
MQTT and click on the result.127.0.0.1. This is a universal IP address that simply means "this device itself" (also known as localhost). Leave the port as 1883 and submit. You should see a success message!v3/pub/HA/WPS2/C66FB8. The data it sends is in a standard JSON format, which looks something like this:We need to tell our MQTT Home Assistant setup how to read this. We'll do this by editing the main configuration file.
configuration.yaml file.
Once Home Assistant restarts, the magic is complete. Navigate back to your main Overview dashboard. Home Assistant is usually smart enough to automatically add your new sensors as cards on the dashboard. You'll see the real-time voltage, current, power, and switch status of your smart plug. You've successfully integrated a physical device into your local smart hub using MQTT Home Assistant. Now, you can use this data to build powerful automations, track energy usage, or create alerts—all processed securely and locally on your Robustel EG5120.
A1: Processing data at the edge on the EG5120 provides four key advantages over cloud-only solutions:
A2: Absolutely. This is one of the EG5120's biggest strengths. It runs RobustOS Pro, which is based on Debian 11, giving you a full, open Linux environment. It also has native support for Docker, which means you can easily deploy other containerized applications right alongside Home Assistant. Many users run software like InfluxDB for data history, Grafana for advanced dashboards, and custom Python or Node.js scripts, turning the gateway into a powerful, all-in-one edge server.
A3: This is a common hurdle, but it's usually easy to fix. Here's a quick checklist I run through:Check YAML Syntax: A single misplaced space can break the configuration. Go to Developer Tools > YAML in your Home Assistant UI and click the "CHECK CONFIGURATION" button. It will tell you if there are any errors.Verify the Broker: Make sure your MQTT broker is actually receiving the messages. A great tool for this is MQTT Explorer. You can use it to connect to your broker and see all the topics and messages in real-time. This confirms the problem is in Home Assistant, not the device itself.Confirm Topic and Payload: Carefully double-check that the state_topic in your configuration.yaml is exactly the same as the topic the device is publishing to. Also, check that the JSON keys in your value_template (e.g., value_json.voltage) perfectly match the keys in the message payload.Restart Home Assistant: Remember, any changes made to configuration.yaml require a full restart of Home Assistant to be applied. You can do this from the YAML page in Developer Tools.


