A diagram showing IoT devices communicating locally with Home Assistant and an MQTT broker on a Robustel EG5120 edge gateway, independent of the cloud.

How to install an MQTT Broker for Home Assistant on the EG5120

Written by: Anson Feng

|

Published on

|

Time to read 6 min

Jens Zhou, Technical Support Engineer at Robustel

Jens Zhou is a Technical Support Engineer at Robustel, specializing in industrial IoT and edge gateway applications. He is experienced with the configuration and deployment of EG series devices, and well-versed in network communication, industrial protocols, and common wireless technologies. He is dedicated to providing practical tutorials to help engineers efficiently build smart systems.

Summary

This article provides a comprehensive, step-by-step guide on how to install and configure a Mosquitto MQTT broker on the Robustel EG5120 Industrial Edge Computing Gateway for use with Home Assistant.

We'll cover everything from the initial setup and command-line installation to the final integration and verification within the Home Assistant interface.

Following these steps will empower you to build a faster, more reliable, and cloud-independent smart home network. 

Introduction

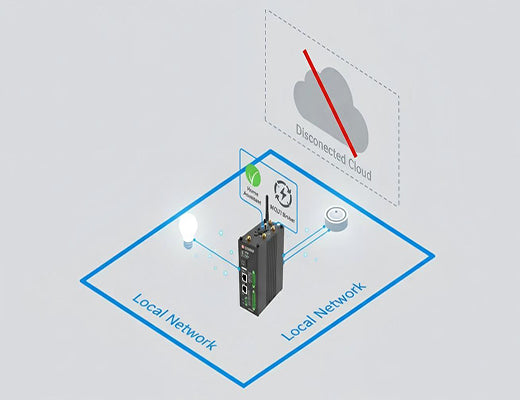
Picture this: your internet connection drops, but your smart home doesn't even flinch. Your lights, sensors, and automations continue to operate flawlessly. This isn't a fantasy; it's the reality of a locally controlled smart home, and the absolute heart of that system is the MQTT broker. While many Home Assistant users run the broker as a simple add-on, I've found that for ultimate reliability, you need rock-solid hardware. Let's be clear: running your smart home's core messaging system on an industrial-grade device is a game-changer.

In my experience, the real 'aha!' moment for smart home enthusiasts is when they realize their cloud-dependent setup is a single, fragile point of failure. That's why today, we're going to elevate your Home Assistant setup. We will walk through how to install an MQTT broker for Home Assistant on a piece of hardware designed for mission-critical applications: the Robustel EG5120. It's easier than you think, and the payoff in speed and reliability is massive.

Why Run a Local MQTT Broker on Your EG5120?

So, what's the big deal about using a device like the EG5120 for your Home Assistant broker, anyway? Isn't the add-on running on a Raspberry Pi good enough? For many, it is. But if you're serious about performance and uptime, the benefits are undeniable.

The Robustel EG5120 is an industrial edge computing gateway. That means it's built from the ground up for stability in harsh environments, running 24/7 without fail.

Here’s what that means for your smart home:

  • Ultimate Reliability: The EG5120 is designed for industrial applications where downtime costs millions. Its hardware is far more robust than consumer-grade alternatives, featuring a stable Debian 11-based OS (RobustOS Pro) , meaning your smart home's central nervous system is running on a foundation of proven stability.
  • Blazing-Fast Local Communication: When your MQTT broker runs locally on a powerful device, the communication between your smart devices is instantaneous. There's no round-trip to a cloud server, which means automations trigger faster and the entire system feels more responsive.
  • Enhanced Security & Privacy: By keeping your MQTT messages within your local network, you significantly reduce your exposure to external threats. Your sensitive data about when you're home or what devices are active isn't being sent over the internet.
  • Cloud Independence: This is the big one. A local broker ensures your core smart home functionality is completely independent of your internet connection or any third-party cloud service.

A diagram showing IoT devices communicating locally with Home Assistant and an MQTT broker on a Robustel EG5120 edge gateway, independent of the cloud.

Prerequisites: What You'll Need

Before we dive in, let's gather the necessary tools. You've probably got most of this already.

  • Robustel EG5120 Gateway: Powered on and ready.
  • A Computer: To access the gateway's interface.
  • Ethernet Cable: For the initial connection to the EG5120.
  • SSH Client: A tool like PuTTY for Windows or the built-in Terminal on macOS/Linux.
  • Internet Access for the Gateway: The EG5120 needs to be connected to the internet to download the Mosquitto broker software. You can learn more about its connectivity options in the official product datasheet.
  • Home Assistant Installed: EG5120 has already installed Home Assistant. For detailed steps, you can refer to " How to Install Home Assistant on an Industrial IoT Gateway (EG5120)".

Step-by-Step: How to Install MQTT Broker Home Assistant on the EG5120

Alright, let's get our hands dirty. Follow these steps carefully, and you'll have a broker up and running in no time.

Step 1: Initial Gateway Connection & Login

First, we need to get into the EG5120's command center.

  1. Power up the EG5120 and wait a minute for the system to fully boot.
  2. Connect the gateway to your computer using an Ethernet cable.
  3. Configure your computer's IPv4 network card settings to obtain an IP address automatically via DHCP.
  4. Open a web browser and navigate to the Home Assistant URL provided with your gateway's software stack, which is often http://192.168.0.1:8123. Create your initial user account here; we'll need it for the next step.
A screenshot of the Home Assistant onboarding welcome screen shown in a web browser. The title reads "Welcome!" with the prompt: "Are you ready to awaken your home, reclaim your privacy and join a worldwide community of tinkerers?" Below this, there is a prominent blue button labeled "CREATE MY SMART HOME." Other options include "Upload backup" and "Home Assistant Cloud" for restoring existing configurations. At the bottom are links to "Read our vision," "Join our community," and "Download our app." The browser address bar shows a local IP address and the connection is marked "Not Secure."

Step 2: Installing the Mosquitto Broker

Now, we'll use the command line to install Mosquitto, a very popular and lightweight open-source MQTT broker.

  1. Open your SSH client (PuTTY or Terminal).
  2. Connect to the device using the sudo user you created in the Home Assistant web interface. The command will be: ssh your_username@192.168.0.1
  3. Enter your password when prompted.
  4. Once logged in, run the following commands to update your package list and install Mosquitto and the client tools:

sudo apt update sudo apt install mosquitto mosquitto-clients -y

The -y flag automatically answers "yes" to the installation prompt. Easy, right?

Step 3: Configuring Mosquitto for External Access

By default, Mosquitto is locked down. We need to create a simple configuration file to allow devices on your network to connect to it.

  1. Use the nano text editor to create a new configuration file. It's a straightforward command-line editor that's perfect for this job.

sudo vi /etc/mosquitto/conf.d/default.conf

  1. Press the i key, add the following two lines to the file:
listener 1883 0.0.0.0 allow_anonymous true
  1. Press the Esc key, then enter :wq , and finally press Enterto confirm.
Screenshot of a terminal window showing the commands to edit the Mosquitto configuration file for a Home Assistant MQTT broker on the EG5120.

Step 4: Restart Mosquitto and Integrate with Home Assistant

For our changes to take effect, we need to restart the broker service. Then, we'll tell Home Assistant where to find it.

  1. Restart the Mosquitto service with this command:

sudo systemctl restart mosquitto
  1. Now, go back to your Home Assistant web interface (http://192.168.0.1:8123).
  2. Navigate to Settings > Devices & Services.
  3. Click the + ADD INTEGRATION button in the bottom right corner.
  4. Search for MQTT, click on the result, and a configuration window will pop up.
  5. In the "Broker" field, enter 127.0.0.1. Leave the port as 1883 and submit. Home Assistant will connect to the broker running on the same machine.

Step 5: Verifying Your MQTT Broker is Working

Let's do a quick test to make sure everything is communicating correctly. This is the satisfying part where you see it all come together.

  1. From the Devices & Services page, find your new MQTT integration and click on it.
  2. Click CONFIGURE.
  3. In the "Listen to a topic" section, type test into the topic box and click START LISTENING.
  4. Now, move up to the "Publish a packet" section.
    • Set the Topic to test.
    • Set the Payload to hello.

  1. Click PUBLISH.

You should instantly see the message appear under "Listen to a topic." If you see "Message 0 received on test at..." with the payload "hello," congratulations! You have successfully managed to install an MQTT Broker for Home Assistant.

A screenshot of the Home Assistant interface successfully testing the local MQTT broker, showing a published message being received.

FAQ

Q1: Why did we use 127.0.0.1 as the IP address in the Home Assistant integration?

A1: 127.0.0.1 is the "localhost" or "loopback" address. It's a standard IP address that always refers to the local machine itself. Since both Home Assistant and your Mosquitto broker are running on the same EG5120 device, using 127.0.0.1 is the most direct and efficient way for them to communicate, without needing to send traffic out onto your physical network.

Q2: Is it safe to run the MQTT broker without a password (allow_anonymous true)?

A2: For a strictly local home network that is secured by a firewall, this configuration is generally considered acceptable for simplicity. However, if your network is not secure, or if you plan to expose the broker to the internet (which is NOT recommended), you absolutely must set up username and password authentication. You can find detailed instructions on the official Mosquitto documentation. The configuration we used today is for ease of setup in a trusted environment.

Q3: Can I run other applications besides Home Assistant and MQTT on the EG5120?

A3: Absolutely. That's the power of an edge computing gateway. The EG5120 runs a full Debian 11-based OS and supports Docker containerization . This means you have the flexibility to deploy a wide range of other applications, such as databases (InfluxDB), visualization tools (Grafana), or your own custom Python scripts, right alongside your smart home services. It's a truly versatile platform for any serious IoT project.